 Hi!
Hi! Welcome! If you started at the beginning of the super-cool Just Add Ink Blog Hop, then you've finally made it to my little corner! You may have come from Nicole's amazing tutorial on Emboss Resist, or you may have come straight from JAI....either way - HI!
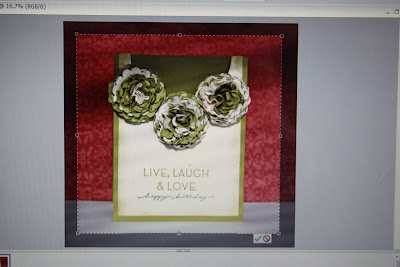
I have had questions asking how I have blurred the edges of my photos, so I'm just going to show a little step-by-step on how to do that, using Photoshop.
5. While your box is still highlighted, go to EDIT and choose "Fill Layer".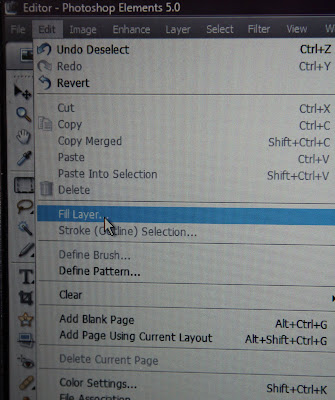
 Sometimes I find that the edges isn't white enough like the photo above. I think this depends on the colours in the photo so I repeat the process. I draw another box, inverse it, fill selection white and deselect it again.
 I hope this helps you with your photo editing! I personally think some cards really benefit from an effect like this on the edges and some others look better left alone - best to go with the flow and fiddle and see what YOU like best!
Click on "Just Add Ink Blog Hop" to take you back to Just Add Ink and don't forget to check out the rest of the Teams fantastic tutorials again if you haven't already seen them!!!! Leave them a comment if you want - feedback is a friend! They are all so wonderful! I'm so proud to be part of such an amazingly talented team. By the way, how to make the flowers? Follow this perfect tutorial.
Tania

1.On the Tool Bar on the right hand side, click on "Rectangular Marquee Tool" (the dotted square). You will notice at the Top Bar there is a few options of different shapes. I chose the square. 
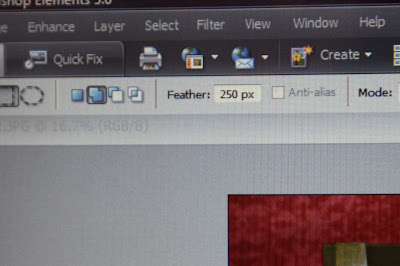
2. You will need to enter a Feather Radius Number in the "Feather" box. The higher the number, the larger the area will be feathered. I generally choose 150px (the pic is currently set at 250px).
3. Next, draw a box inside the edges of your photo. (The higher the Feather Radius Number, the more curved the box corners will be.) You will need to click on the Green Tick (bottom right hand corner of your new box) to set it.
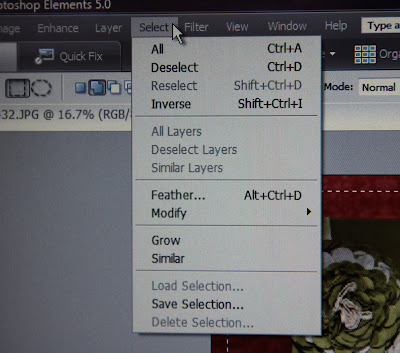
4. Go to SELECT tab at top of screen, and click "Inverse". This reverses what is selected by the box to include the outer edges of photo not included in the initial box.
4. Go to SELECT tab at top of screen, and click "Inverse". This reverses what is selected by the box to include the outer edges of photo not included in the initial box.
5. While your box is still highlighted, go to EDIT and choose "Fill Layer".
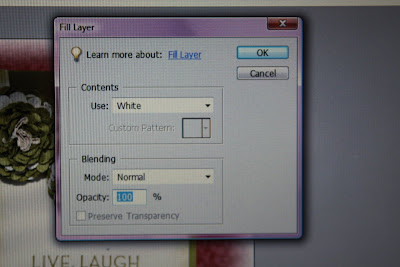
6. Choose "White". You will then need to go back to SELECT and click "Deselect".
Sometimes I find that the edges isn't white enough like the photo above. I think this depends on the colours in the photo so I repeat the process. I draw another box, inverse it, fill selection white and deselect it again. I hope this helps you with your photo editing! I personally think some cards really benefit from an effect like this on the edges and some others look better left alone - best to go with the flow and fiddle and see what YOU like best!Click on "Just Add Ink Blog Hop" to take you back to Just Add Ink and don't forget to check out the rest of the Teams fantastic tutorials again if you haven't already seen them!!!! Leave them a comment if you want - feedback is a friend! They are all so wonderful! I'm so proud to be part of such an amazingly talented team. By the way, how to make the flowers? Follow this perfect tutorial.
Tania

I must try this - I never do much to my pics but it really makes a difference to the finished image. Thanks Chantell
ReplyDeleteAhhh! I have been wanting to try this. Your photos always look great. Thanks Tania!
ReplyDeleteI've wondered how ppl do this and now I know... must try it for my blog pics and maybe some scrapping pages....
ReplyDeleteThanks! Aloha, Kim
ReplyDeleteI've just downloaded my 30 day free trial of PSE, and feel confident about having a play thanks to your wonderful tutorial! Thanks Tania!!
ReplyDeleteHmmm...I am so not a Photoshop fan...grr...bad experiences!! Thanks for sharing though. I think I can do something similar with the program I use...just never think of it. Great idea.
ReplyDeleteThanks great tutorial, I will have to have a play.
ReplyDeleteThanks Tanya! Like Amanda I want to try the free trial before I pay for it, but it's great to know what Photoshop can do! Do you have any more tips you could share another time? Maybe fixing the colour, lightening, etc?
ReplyDeleteLee x
PS. I adore the flowers on your card!
I'm a HUGE fan of PS but have never known how to do this! Thanks Tania :)
ReplyDeleteThank you for this info.. I have been meaning to look up how to do it..You're the bomb!!
ReplyDeleteI must give this a try when I next edit my photo before posting to my blog!
ReplyDeleteI use Photo Shop but only discover things by trial and error!!! It's great to know how to use it in a different way. Thanks, Tania. More tutorials on PS will be greatly appreciated, pretty please!
ReplyDeleteThanks so much. Always wondered how this was done. Only have pse3 so will have a go and see if it works too.
ReplyDeleteThis is a fantastic tutorial! Love the step by step pics, it makes it so user-friendly! xx
ReplyDeleteThanks for sharing!! Inspirational:)
ReplyDeleteThanks for sharing, I don't have photoshop who knows maybe it will work with what I have.
ReplyDeleteThanks for the tips. I don't normally do anything to my photos, but I will definitely check out the program that came with my computer and play around with it. Love your card.
ReplyDeletethanks for sharing this useful tutorial - I just love these how to tips!
ReplyDeleteOh it makes your photos so professional. love the girth control too!
ReplyDeleteThanks for the great techno tute Nadine! TFS :)
ReplyDeleteI've finally tried blurring the edges of my photos... I had to put my thinking cap on a little as I use GIMP and not Photoshop, but it worked.... here's my first blurred pic if ur interested... http://stampinwithrichelle.blogspot.com/2010/06/always-first-ink.html
ReplyDeleteThanks Tania!!!!!!!!!!
Take care, Richelle